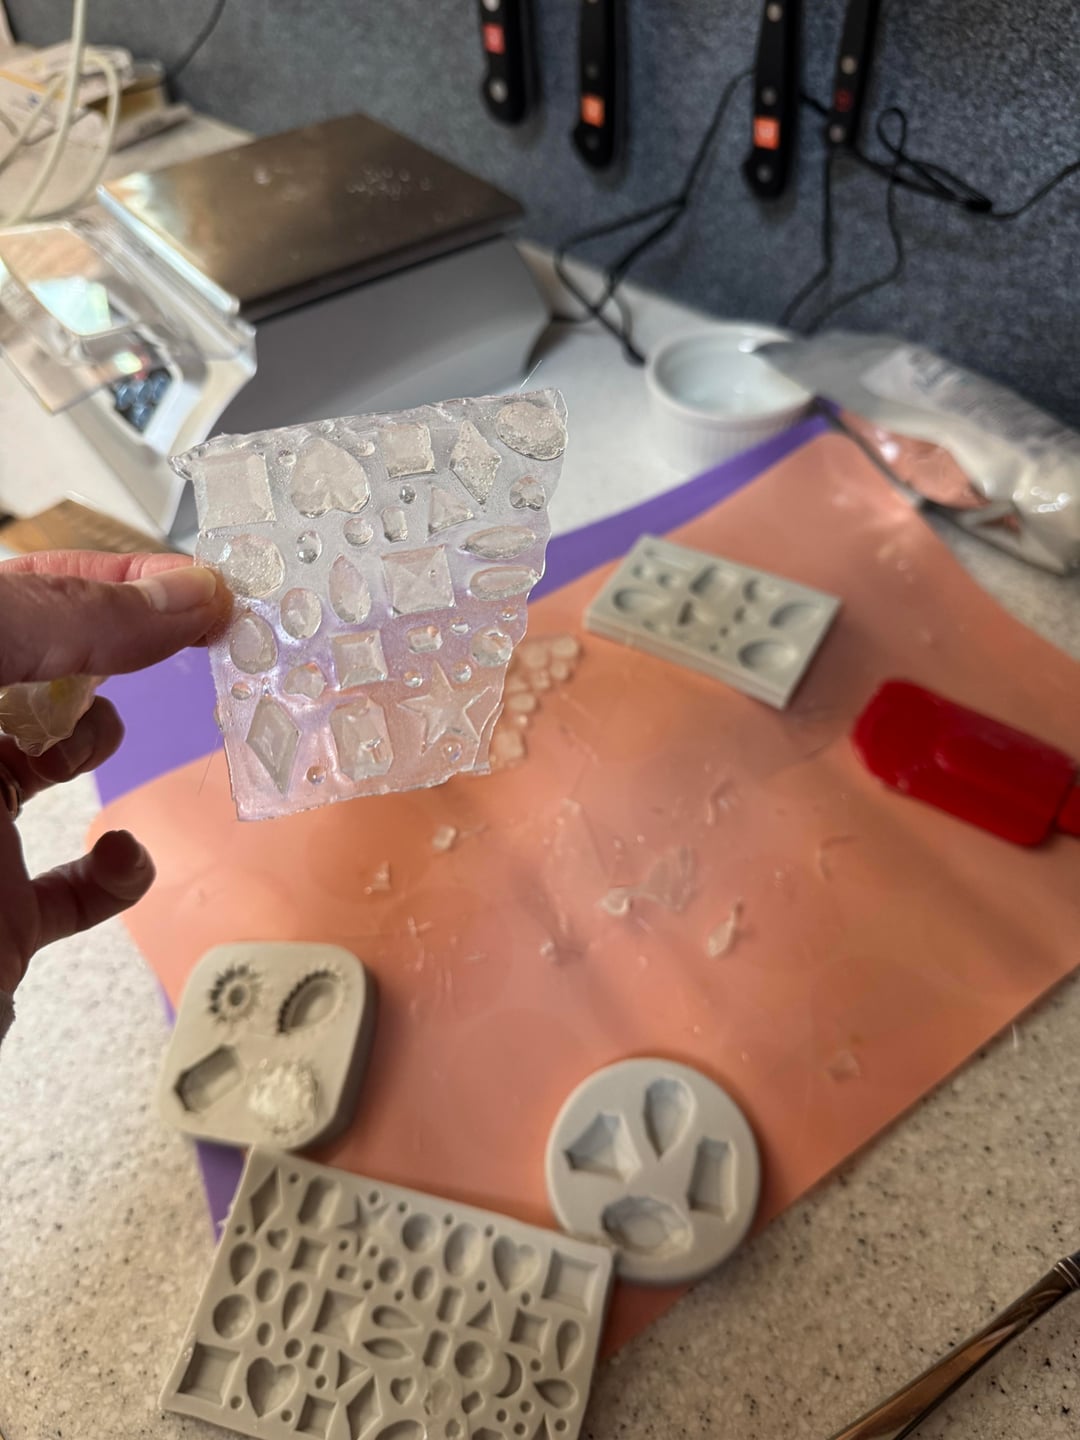
Help! Pointers? I’m wanting to make this ring but this is the result I’m getting with isomalt. How do you get it so clear?
Help! Pointers? I’m wanting to make this ring but this is the result I’m getting with isomalt. How do you get it so clear?
by Klutzy_Arm_7930
7 Comments
lenaguzzo7
You should be able to hit it with some heat right after you pour it into the mould to get it more clear. I would check your mould’s temperature resistance just to be sure before you torch it lol
bakedalaskan85
I’ve done them twice, had some luck on a few but less on others. They take a day or two to fully dry, the second time I only did over night. They turned cloudy and sticky in the package 😭 some slight heat from a torch will help, so does stirring slowing and pouring slowly to avoid bubbles in the first place. Tap the moles after you fill them if you can. There’s a lot of videos on YouTube too!
mombgb
These are actually my cookies!! So the big thing is letting the isomalt bubbles settle before you pour them into the molds. I stir the liquid and then tap the bottom of the container to help the bubble go away. Use the silicone molds. I also dust the molds with a little edible glitter dust then pour in the isomalt. You can also use a heat gun once their cooled but be quick about it. Hope that helps!
BringItBackNowYall
I’m also thinking you probably don’t need to fill the entire mode. Precisely pour in a bit to the one or two you want so you don’t get a sheet upon removal.
mombgb
If you want to learn more about isomalt head over to IG simisugarcompany. Sydney is a true artist! She has a isomalt FAQ’s
ElleYesMon
Yep. Heat it up.
kaleidoscope_eyes_13
First, safety! Make sure you are wearing both cotton and nitrile gloves to protect your hands. Then start with a high quality isomalt. I prefer Simi Cakes. It’s pretempered so you just microwave and go. No need to hit a certain temperature.
Next, get a quality silicone bowl to melt it in. I prefer the OXO brand because they are thicker and sturdy. It makes it easier to control the pour. In that photo your molds are over filled. You want to fill just each individually gem cavity.
What someone said above is correct. Bring the isomalt to a rolling boil then let it step until the bubbles stop moving. A high quality isomalt allows for more workability time so your isomalt with stay more liquidy longer. Once you pour, hit it with a kitchen torch to bring any remaining bubbles to the surface. You will have tiny bubbles on the mold side when you remove them. Silicone breaths. It’s just how it works. Those can easily be removed with light torching.
The final step is to seal your isomalt so they don’t get sticky any cloudy. PME glaze spray is the best for this. It has no flavor once it dries and it locks out the moisture to keep your isomalt clear.


7 Comments
You should be able to hit it with some heat right after you pour it into the mould to get it more clear. I would check your mould’s temperature resistance just to be sure before you torch it lol
I’ve done them twice, had some luck on a few but less on others. They take a day or two to fully dry, the second time I only did over night. They turned cloudy and sticky in the package 😭 some slight heat from a torch will help, so does stirring slowing and pouring slowly to avoid bubbles in the first place. Tap the moles after you fill them if you can. There’s a lot of videos on YouTube too!
These are actually my cookies!! So the big thing is letting the isomalt bubbles settle before you pour them into the molds. I stir the liquid and then tap the bottom of the container to help the bubble go away. Use the silicone molds. I also dust the molds with a little edible glitter dust then pour in the isomalt. You can also use a heat gun once their cooled but be quick about it. Hope that helps!
I’m also thinking you probably don’t need to fill the entire mode. Precisely pour in a bit to the one or two you want so you don’t get a sheet upon removal.
If you want to learn more about isomalt head over to IG simisugarcompany. Sydney is a true artist! She has a isomalt FAQ’s
Yep. Heat it up.
First, safety! Make sure you are wearing both cotton and nitrile gloves to protect your hands.
Then start with a high quality isomalt. I prefer Simi Cakes. It’s pretempered so you just microwave and go. No need to hit a certain temperature.
Next, get a quality silicone bowl to melt it in. I prefer the OXO brand because they are thicker and sturdy. It makes it easier to control the pour. In that photo your molds are over filled. You want to fill just each individually gem cavity.
What someone said above is correct. Bring the isomalt to a rolling boil then let it step until the bubbles stop moving. A high quality isomalt allows for more workability time so your isomalt with stay more liquidy longer. Once you pour, hit it with a kitchen torch to bring any remaining bubbles to the surface.
You will have tiny bubbles on the mold side when you remove them. Silicone breaths. It’s just how it works. Those can easily be removed with light torching.
The final step is to seal your isomalt so they don’t get sticky any cloudy. PME glaze spray is the best for this. It has no flavor once it dries and it locks out the moisture to keep your isomalt clear.
Source: I’m a sugar artist