This is masterclass amazing. It’s only lacking one thing unfortunately……
My address for immediate delivery.
Maximum_Still_2617
Beautiful! Recipe+any tips?
captain-canada1234
Teach us your ways. They look phenomenal. That for sure is masterclass
JDHK007
Any tips? Trying to make tomorrow for the first time ever
Loud-Business7203
They look perfect. Recipe?
VallenyF
Those look scrumptious
wispyfern
Beautiful!
manbar06
Nicely done!
Dependent_Stop_3121
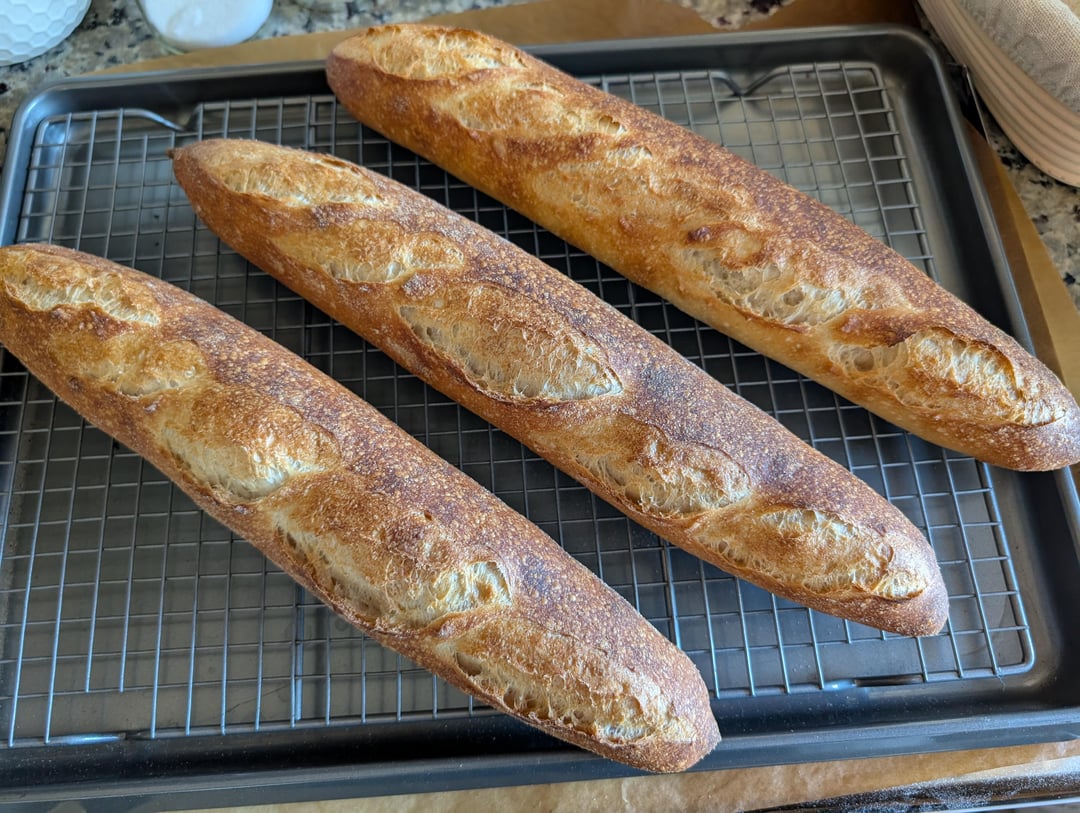
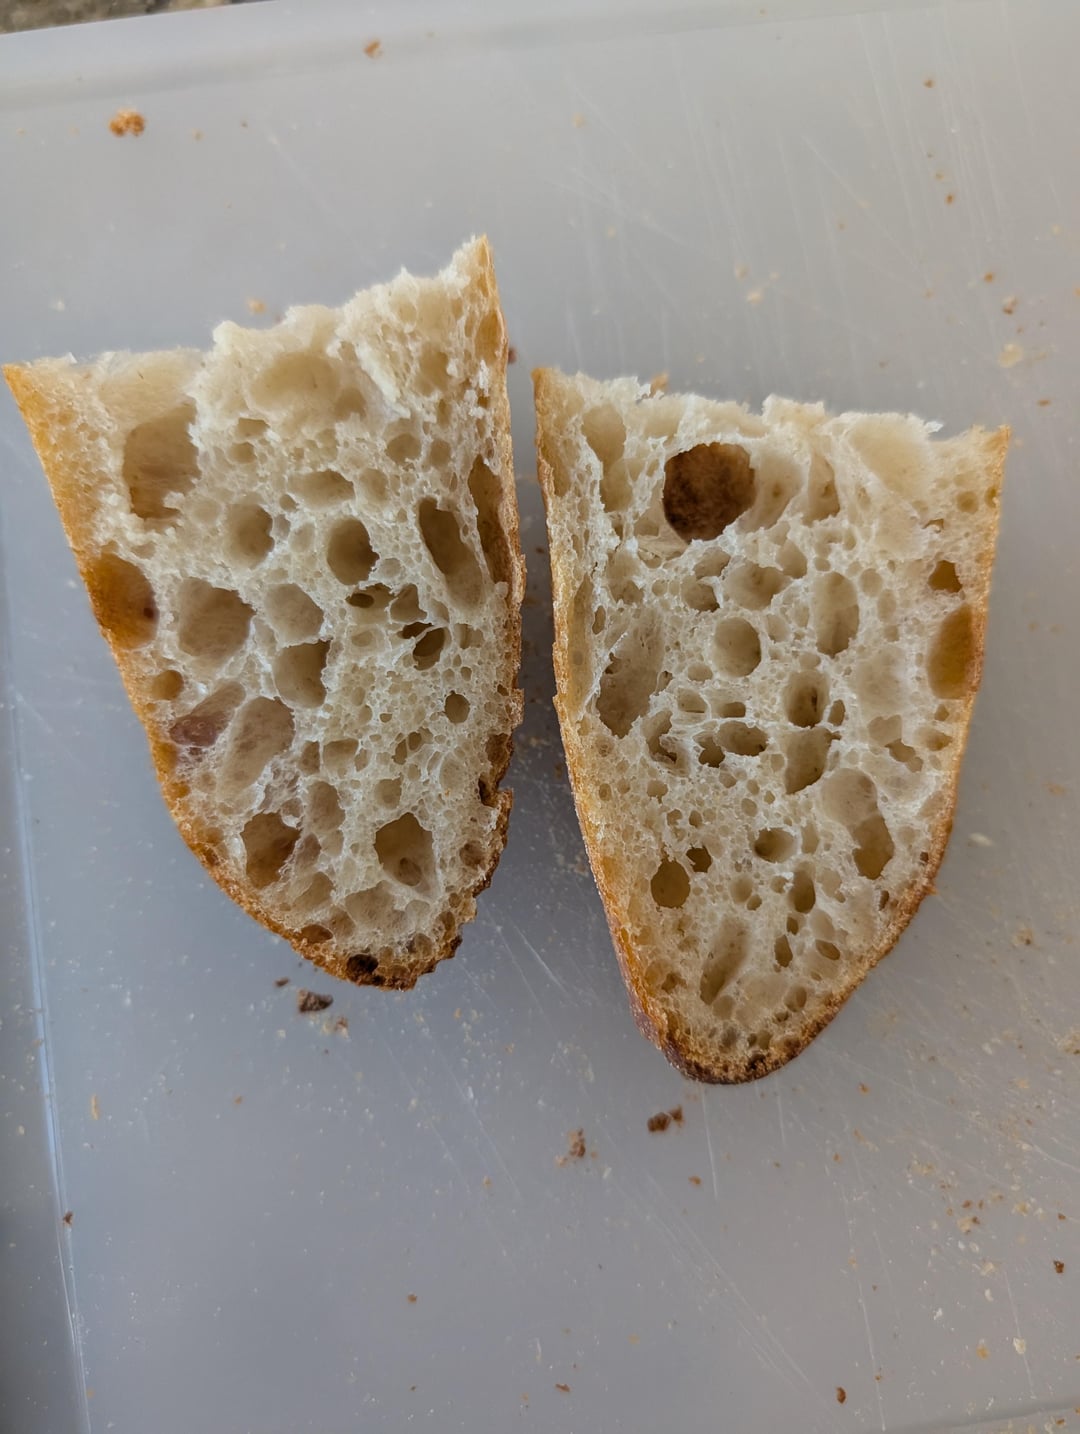
Practice sure does make perfect doesn’t it? These are absolutely gorgeous. How long is your final proofing?
I think I need to final proof for a tiny bit longer to get larger bubbles inside?
smokedcatfish
Perfect crumb.
broadbandburner
Recipe 400g AP flour (preferably King Arthur or Central Milling) 300g water (split into 280g for main mix and 20g for bassinage) 40g sourdough starter (or a poolish if you like) 8g salt 0.6g instant yeast (note that we do use a natural levain in the mix, but using only a 100% levain recipe would have very different timings that I still need to experiment with, so the yeast is used for consistency of fermentation)
Process (this particular recipe is done with a mechanical mixer, I’m still working on a hand mix only recipe) Day 1. 1. Autolyse flour and water then rest for 30 minutes to an hour, reserving the rest of the water for bassinage 2. Add starter + yeast and begin mixing on lowest speed until starter is fully incorporated 3. Add salt, and continue mixing on lowest speed for about 3 minutes to ensure all salt is fully mixed in. Salt tightens up the gluten after being mixed in so look for an elastic dough starting to form before moving on to the next step 4. Turn up speed, (roughly a 4 on a KitchenAid pro) and begin adding the reserved water a little bit at a time (I do about 4 or 5 times). – You’ll notice that the dough sloshes the water around and becomes flimsy, with some pieces coming apart; this is normal so continue mixing until water is fully incorporated and dough comes back together, repeating this process about 4 times. This process can take anywhere between 5-8 minutes depending on the speed that you’re mixing at, so follow the next step to know when mixing is complete. – The final dough should be shiny and smooth and can easily make a windowpane, and you should be able to see the “strings” of gluten that makes up the dough. – Ideally, the dough temp should measure 75-78°F (or 24-36°C); this part is critically important! 5. Take the dough out and put it into a container, giving it a few folds in the container then flipping it over so the folds are at the bottom and you have the smooth side on top. Let rest for 1h15m 6. After the rest, do a coil fold, keeping the smooth side on top, then put the dough into the fridge right away until the next day. Overnight cold fermentation should last 18-24 hours, but you can experiment to see what works best for you.
Day 2. 1. Take the dough out of the fridge, sprinkle white flour onto the top, and release it from the bulk fermentation container onto the counter/bench, keeping the floured side down. 2. Divide the dough into 3x ~245-250 pieces and preshape into tubes or mini batards, seam side down and smooth floured side up. Cover with a towel and let it rest for 30 minutes to an hour depending on your kitchen temperature. I typically look for the dough having become relaxed, not expanded too much, and looking somewhat like uncooked ciabattas at the end of the bench rest. 3. Prepare your couche or linen cloth/towel by dusting it with either white flour or whole wheat flour. I prefer whole wheat because it adds a very nice crunch after baking. 4. Lightly flour the counter, take one of the preshaped tubes, turn it smooth floured side down (seam side up), and very very lightly flour the top (which used to be the sticky bottom). 5. Gently but firmly pat to degas until the dough is flat but not pressed into the counter. Don’t be afraid of popping bubbles that show up as you’re doing this because they’ll be back! 6. Shape into baguettes – best for you to reference a few videos to see how it’s done instead of me describing with words. I plan on making videos documenting the process for the breads I make eventually, but for now, check out the King Arthur baking channel, Maurizio’s Perfect Loaf, or Boulangerie pas a pas on YouTube to see how they do shaping. 7. Place the shaped baguette seam side up onto the couche/linen, and repeat steps 4 to 6 for the other 2 dough pieces, to then cover and let rest for another 1h15m while preheating the oven at 480°F (or 250°C) with a baking stone or steel. You can optionally also put the couche on a tray and keep it in the fridge at the 1h mark if you need to step away for a bit. Keeping them in the fridge overnight seems to overferment them so I try to bake on the same day. 8. Before baking, place baguettes on top of a peel with parchment, floured smooth side up, and score. This is another one of those things where it’s probably better to reference videos from the bakers I mentioned earlier. Slash quickly and confidently with your bread lame! 8. Load the scored baguettes onto the stone/steel, then bake for 12 minutes with steam (easiest way to do this is just have a cast iron pan on a rack below the stone/steel that gets preheated as well) 9. Move baguettes off parchment paper and continue baking for 12 minutes directly on the stone/steel. For this 2nd half of the bake, you can choose to pull the baguettes out earlier if you prefer a blonder loaf, but I personally like a darker shade of brown. 10. Remove baguettes from the oven and let them cool for at least an hour on a wire rack, and you’re done!
number1jim_
Glorious!
SillyCubensis
Legit. That is a beautiful baguette.
And thank you for the detailed write up of your technique.


15 Comments
They look like they puffed up nicely!
They look perfect
This is masterclass amazing. It’s only lacking one thing unfortunately……
My address for immediate delivery.
Beautiful! Recipe+any tips?
Teach us your ways. They look phenomenal. That for sure is masterclass
Any tips? Trying to make tomorrow for the first time ever
They look perfect. Recipe?
Those look scrumptious
Beautiful!
Nicely done!
Practice sure does make perfect doesn’t it? These are absolutely gorgeous. How long is your final proofing?
I think I need to final proof for a tiny bit longer to get larger bubbles inside?
Perfect crumb.
Recipe
400g AP flour (preferably King Arthur or Central Milling)
300g water (split into 280g for main mix and 20g for bassinage)
40g sourdough starter (or a poolish if you like)
8g salt
0.6g instant yeast (note that we do use a natural levain in the mix, but using only a 100% levain recipe would have very different timings that I still need to experiment with, so the yeast is used for consistency of fermentation)
Process (this particular recipe is done with a mechanical mixer, I’m still working on a hand mix only recipe)
Day 1.
1. Autolyse flour and water then rest for 30 minutes to an hour, reserving the rest of the water for bassinage
2. Add starter + yeast and begin mixing on lowest speed until starter is fully incorporated
3. Add salt, and continue mixing on lowest speed for about 3 minutes to ensure all salt is fully mixed in. Salt tightens up the gluten after being mixed in so look for an elastic dough starting to form before moving on to the next step
4. Turn up speed, (roughly a 4 on a KitchenAid pro) and begin adding the reserved water a little bit at a time (I do about 4 or 5 times).
– You’ll notice that the dough sloshes the water around and becomes flimsy, with some pieces coming apart; this is normal so continue mixing until water is fully incorporated and dough comes back together, repeating this process about 4 times. This process can take anywhere between 5-8 minutes depending on the speed that you’re mixing at, so follow the next step to know when mixing is complete.
– The final dough should be shiny and smooth and can easily make a windowpane, and you should be able to see the “strings” of gluten that makes up the dough.
– Ideally, the dough temp should measure 75-78°F (or 24-36°C); this part is critically important!
5. Take the dough out and put it into a container, giving it a few folds in the container then flipping it over so the folds are at the bottom and you have the smooth side on top. Let rest for 1h15m
6. After the rest, do a coil fold, keeping the smooth side on top, then put the dough into the fridge right away until the next day. Overnight cold fermentation should last 18-24 hours, but you can experiment to see what works best for you.
Day 2.
1. Take the dough out of the fridge, sprinkle white flour onto the top, and release it from the bulk fermentation container onto the counter/bench, keeping the floured side down.
2. Divide the dough into 3x ~245-250 pieces and preshape into tubes or mini batards, seam side down and smooth floured side up. Cover with a towel and let it rest for 30 minutes to an hour depending on your kitchen temperature. I typically look for the dough having become relaxed, not expanded too much, and looking somewhat like uncooked ciabattas at the end of the bench rest.
3. Prepare your couche or linen cloth/towel by dusting it with either white flour or whole wheat flour. I prefer whole wheat because it adds a very nice crunch after baking.
4. Lightly flour the counter, take one of the preshaped tubes, turn it smooth floured side down (seam side up), and very very lightly flour the top (which used to be the sticky bottom).
5. Gently but firmly pat to degas until the dough is flat but not pressed into the counter. Don’t be afraid of popping bubbles that show up as you’re doing this because they’ll be back!
6. Shape into baguettes – best for you to reference a few videos to see how it’s done instead of me describing with words. I plan on making videos documenting the process for the breads I make eventually, but for now, check out the King Arthur baking channel, Maurizio’s Perfect Loaf, or Boulangerie pas a pas on YouTube to see how they do shaping.
7. Place the shaped baguette seam side up onto the couche/linen, and repeat steps 4 to 6 for the other 2 dough pieces, to then cover and let rest for another 1h15m while preheating the oven at 480°F (or 250°C) with a baking stone or steel. You can optionally also put the couche on a tray and keep it in the fridge at the 1h mark if you need to step away for a bit. Keeping them in the fridge overnight seems to overferment them so I try to bake on the same day.
8. Before baking, place baguettes on top of a peel with parchment, floured smooth side up, and score. This is another one of those things where it’s probably better to reference videos from the bakers I mentioned earlier. Slash quickly and confidently with your bread lame!
8. Load the scored baguettes onto the stone/steel, then bake for 12 minutes with steam (easiest way to do this is just have a cast iron pan on a rack below the stone/steel that gets preheated as well)
9. Move baguettes off parchment paper and continue baking for 12 minutes directly on the stone/steel. For this 2nd half of the bake, you can choose to pull the baguettes out earlier if you prefer a blonder loaf, but I personally like a darker shade of brown.
10. Remove baguettes from the oven and let them cool for at least an hour on a wire rack, and you’re done!
Glorious!
Legit. That is a beautiful baguette.
And thank you for the detailed write up of your technique.