

BAKER BOY: Edd Kimber’s new cookbook, French Bakes Made Simple, should help you produce patisseries at home (Images: PA)
This article contains affiliate links, we will receive a commission on any sales we generate from it. [Learn more]
Edd Kimber is a British baker, food writer, and author who rose to fame as the winner of the very first series of The Great British Bake Off in 2010. At the time, he was working as a debt collector, but his victory on the show launched a full-time career in baking.
Since then, he has become a well-known figure in the UK food scene, admired for his accessible approach to home baking and his knack for creating reliable, flavour-focused recipes. Following his Bake Off win, Edd has written several successful cookbooks, including The Boy Who Bakes, Say It With Cake, Patisserie Made Simple, and One Tin Bakes.
His books often focus on making impressive baking feel achievable at home, whether it’s mastering patisserie techniques or creating quick bakes using just one tin. Now, with his latest cookbook, French Bakes Made Simple, he aims to demystify French baking.
MORE ON FOOD
The book features 80 recipes for classic French patisserie. Here’s our pick of retro treats to recreate at home.
Crème Caramel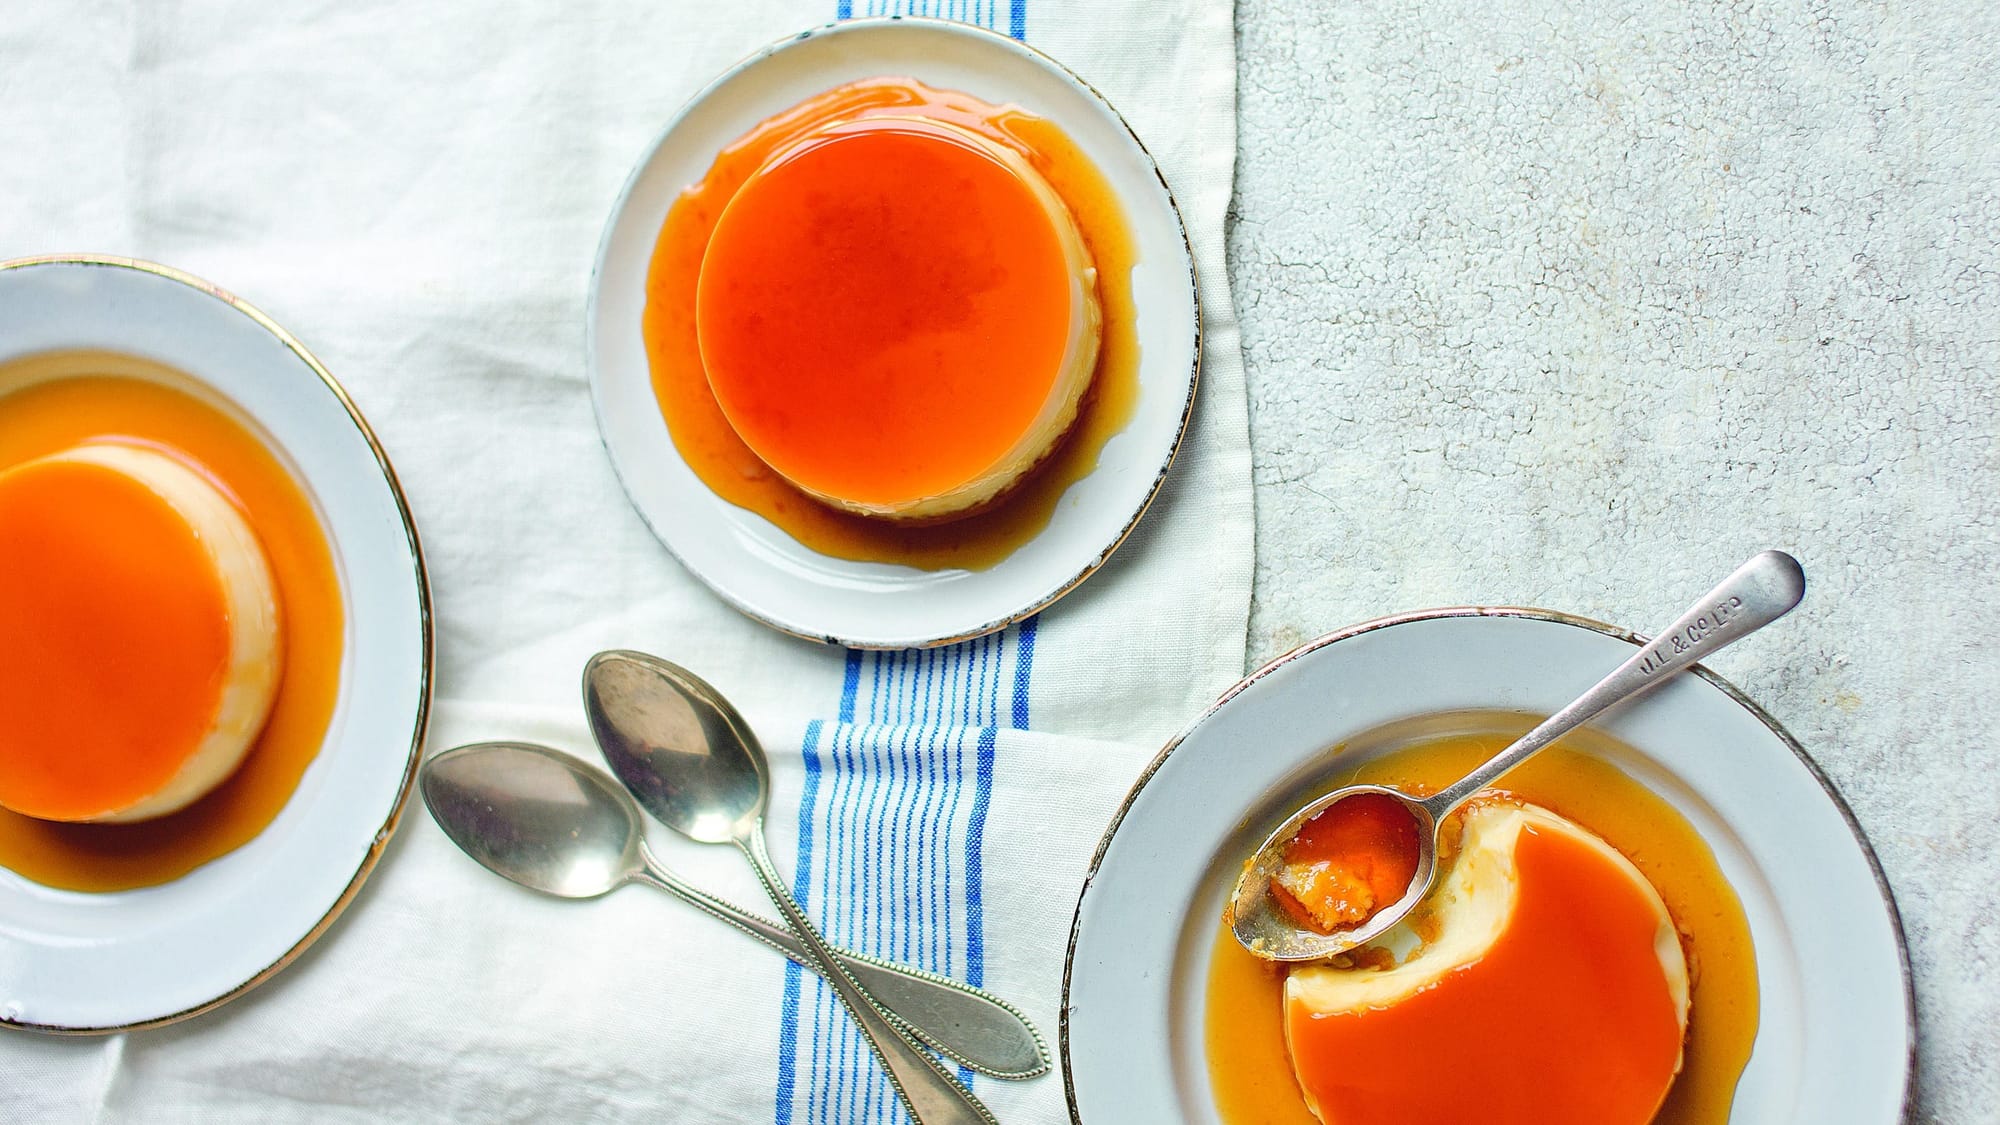
“I find this dessert such a simple comfort,” says Kimber. “It might be the most basic of baked custards, but it really is heaven on a plate. Perhaps it is the memories of eating it as a child, or maybe it’s the texture.
“Either way, it is a delicious, classic dessert that deserves to be brought back from the annals of ‘retro’ and ‘old-fashioned’ to sit proudly on our dinner tables once again.”
Ingredients: (Serves 4-6)
For the caramel:
For the custard:
1 vanilla pod or 2tsp vanilla bean paste400ml whole milk50ml whipping cream4 large eggs125g caster sugar
Method:
1. Put four 9cm ramekins or six 7.5cm dariole moulds in a roasting tin ready by the hob. Preheat the oven to 150°C (130°C fan/300°F), gas mark 2.
2. To make the caramel, put the sugar and three tablespoons of water in a small pan over a medium-high heat, stirring occasionally, until the sugar has dissolved. Once the syrup is clear, stop stirring (as this can cause crystallisation) and allow the sugar to caramelise.
3. Once you have a caramel with a dark copper colour, remove the pan from the heat and immediately divide among the prepared moulds. (Be careful that the caramel doesn’t cook too far as it can burn easily.) Set aside while you make the custard.
4. Cut the vanilla pod, if using, in half and scrape out the seeds. Put the seeds or vanilla bean paste in a medium pan and add the milk and cream. Heat gently over a medium-low heat until the mixture is hot but not boiling.
5. Meanwhile, put the eggs and sugar in a heatproof bowl and whisk together until pale. Once the milk mixture has come to temperature, remove the pan from the heat and slowly pour the mixture over the eggs, stirring constantly. Using a ladle, divide this custard equally between the prepared moulds.
6. Put the roasting tin in the oven and add enough cold water so that it reaches halfway up the sides of the moulds. Bake for 20 to 30 minutes until the custards have set around the outside but still have a wobble in the centre.
7. Carefully remove the roasting tin from the oven. Lift out the custards and put them onto a wire rack to cool. Cover each mould with clingfilm then transfer them to the refrigerator to chill overnight. To serve, use a knife to gently loosen the custards from the moulds. Put a serving plate on top of each mould, and invert it to turn the custards out. Make sure all the caramel drains from the mould onto the custard.
The crème caramels will keep for up to three days stored in the refrigerator.
Chocolate Fondants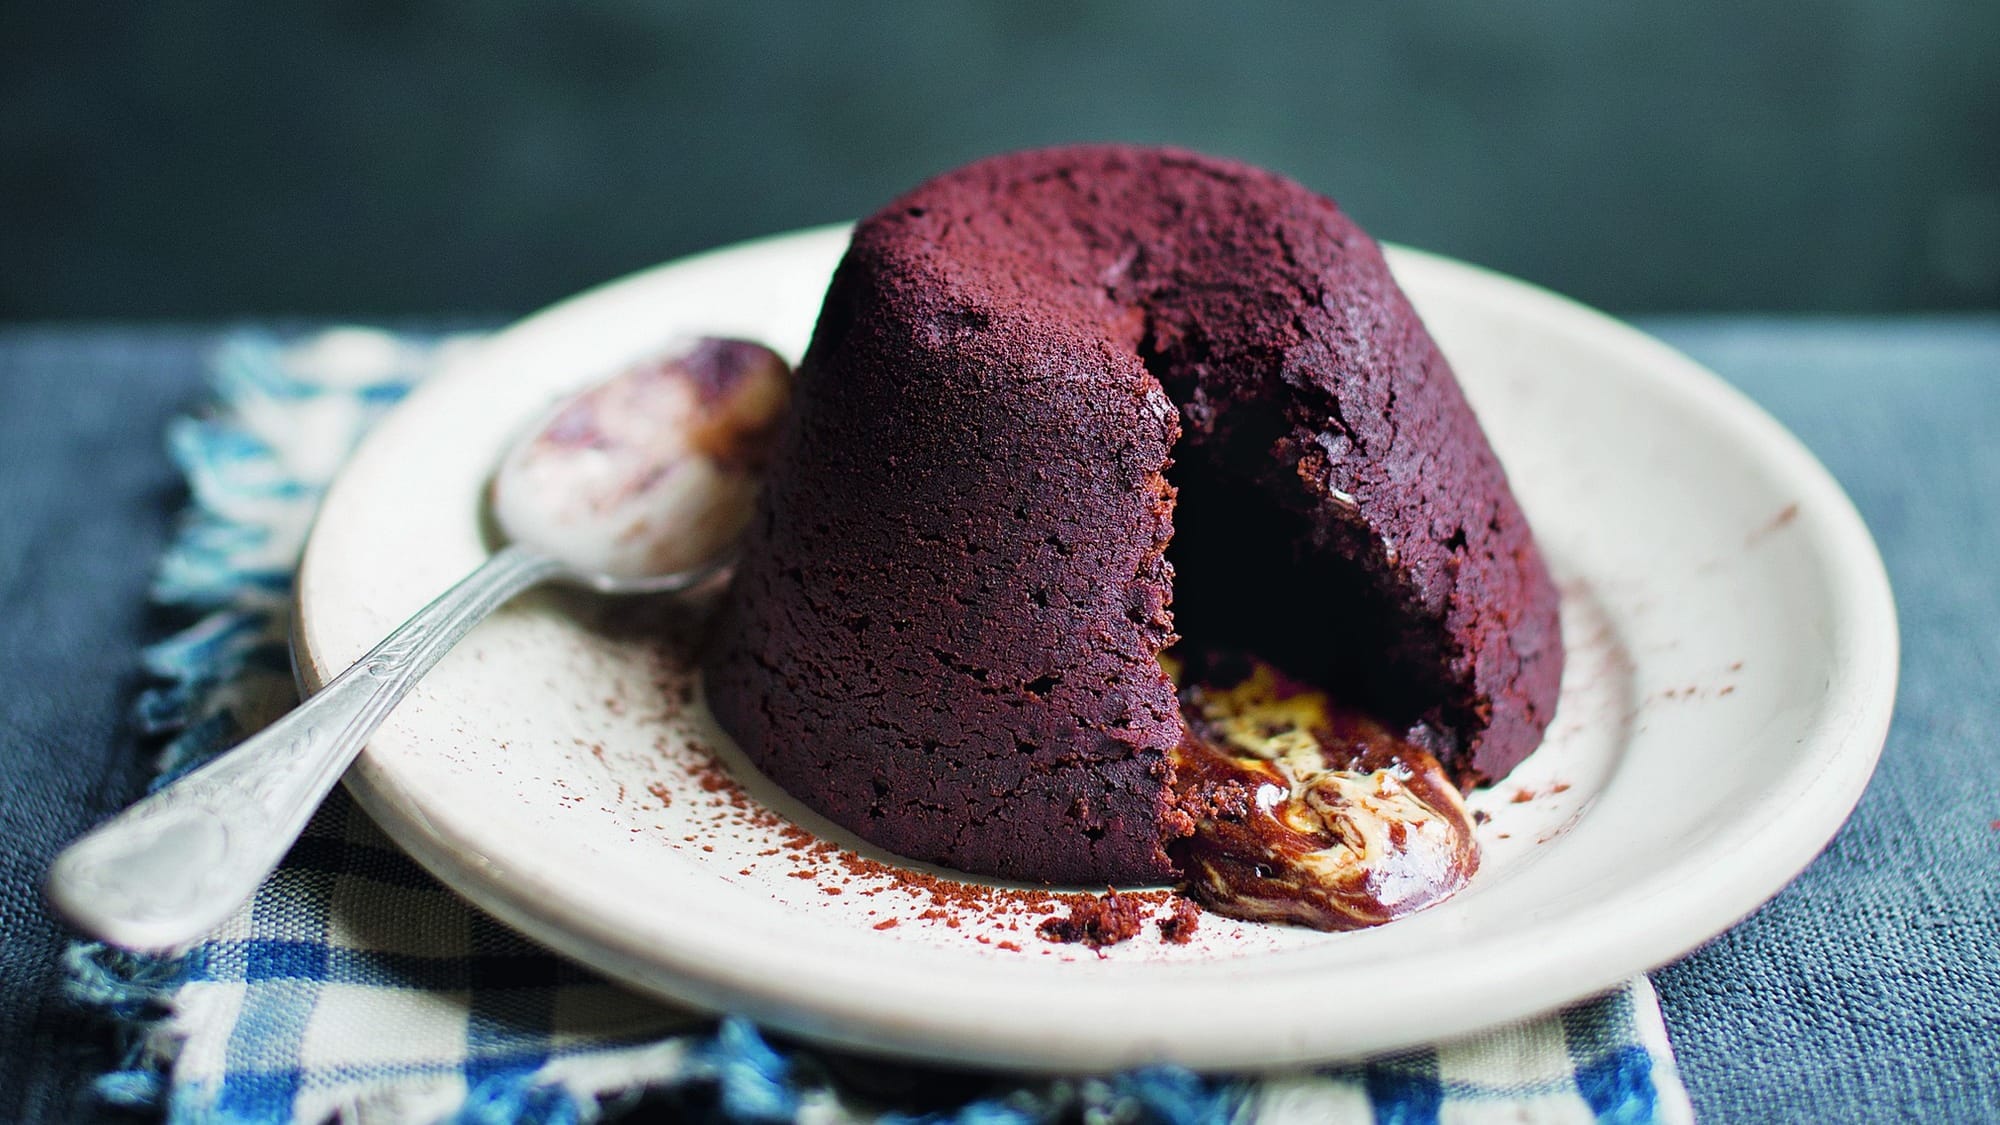
“Sometimes the old-fashioned recipes are the best – and you really can’t get any more retro than this dessert,” says Kimber. “At one point, a chocolate fondant was on the menu at almost every restaurant around. Although it’s considered a bit of a cliché now, if you make these for friends at home, I guarantee that they will love them. You can’t help but be impressed when you cut into the dessert and the molten centre oozes out.”
Ingredients: (Serves 6)
200g unsalted butter, plus extra for greasing1tbsp cocoa powder, plus extra for dusting200g dark chocolate (60–70% cocoa solids), finely chopped5 large eggs125g caster sugar100g plain flourPinch of flaked sea saltCream or vanilla ice cream, to serve
Method:
1. Preheat the oven to 190°C (170°C fan/375°F), gas mark 5 and line a baking tray with baking parchment. Grease six 7.5 centimetre (3 inch) dariole moulds (or small ramekins) with butter and coat with a little cocoa powder, tapping out any excess. Put the dariole moulds onto the prepared tray and set aside.
2. Put the butter and chocolate in a heatproof bowl over a pan of gently simmering water, making sure the base of the bowl doesn’t touch the water. Stir occasionally until fully melted. Remove from the heat and leave to cool slightly.
3. Put the eggs and sugar in a large bowl and, using an electric mixer, whisk for eight minutes or until pale and thick. While still mixing, pour in the chocolate mixture, mixing until fully combined. Sift over the flour and cocoa powder, then add the salt and fold together using a spatula until you have a smooth batter.
4. Using a ladle, divide the batter evenly among the prepared moulds, then bake for eight minutes.
5. Remove from the oven and use a blunt knife to loosen around the edge of each mould. Immediately invert the fondants onto serving plates. Serve straight away with a little cream or vanilla ice cream.
The fondants can be prepared a day ahead and chilled until ready to bake. They can also be frozen and baked straight from the freezer – add five minutes to the cooking time.
Lemon Madeleines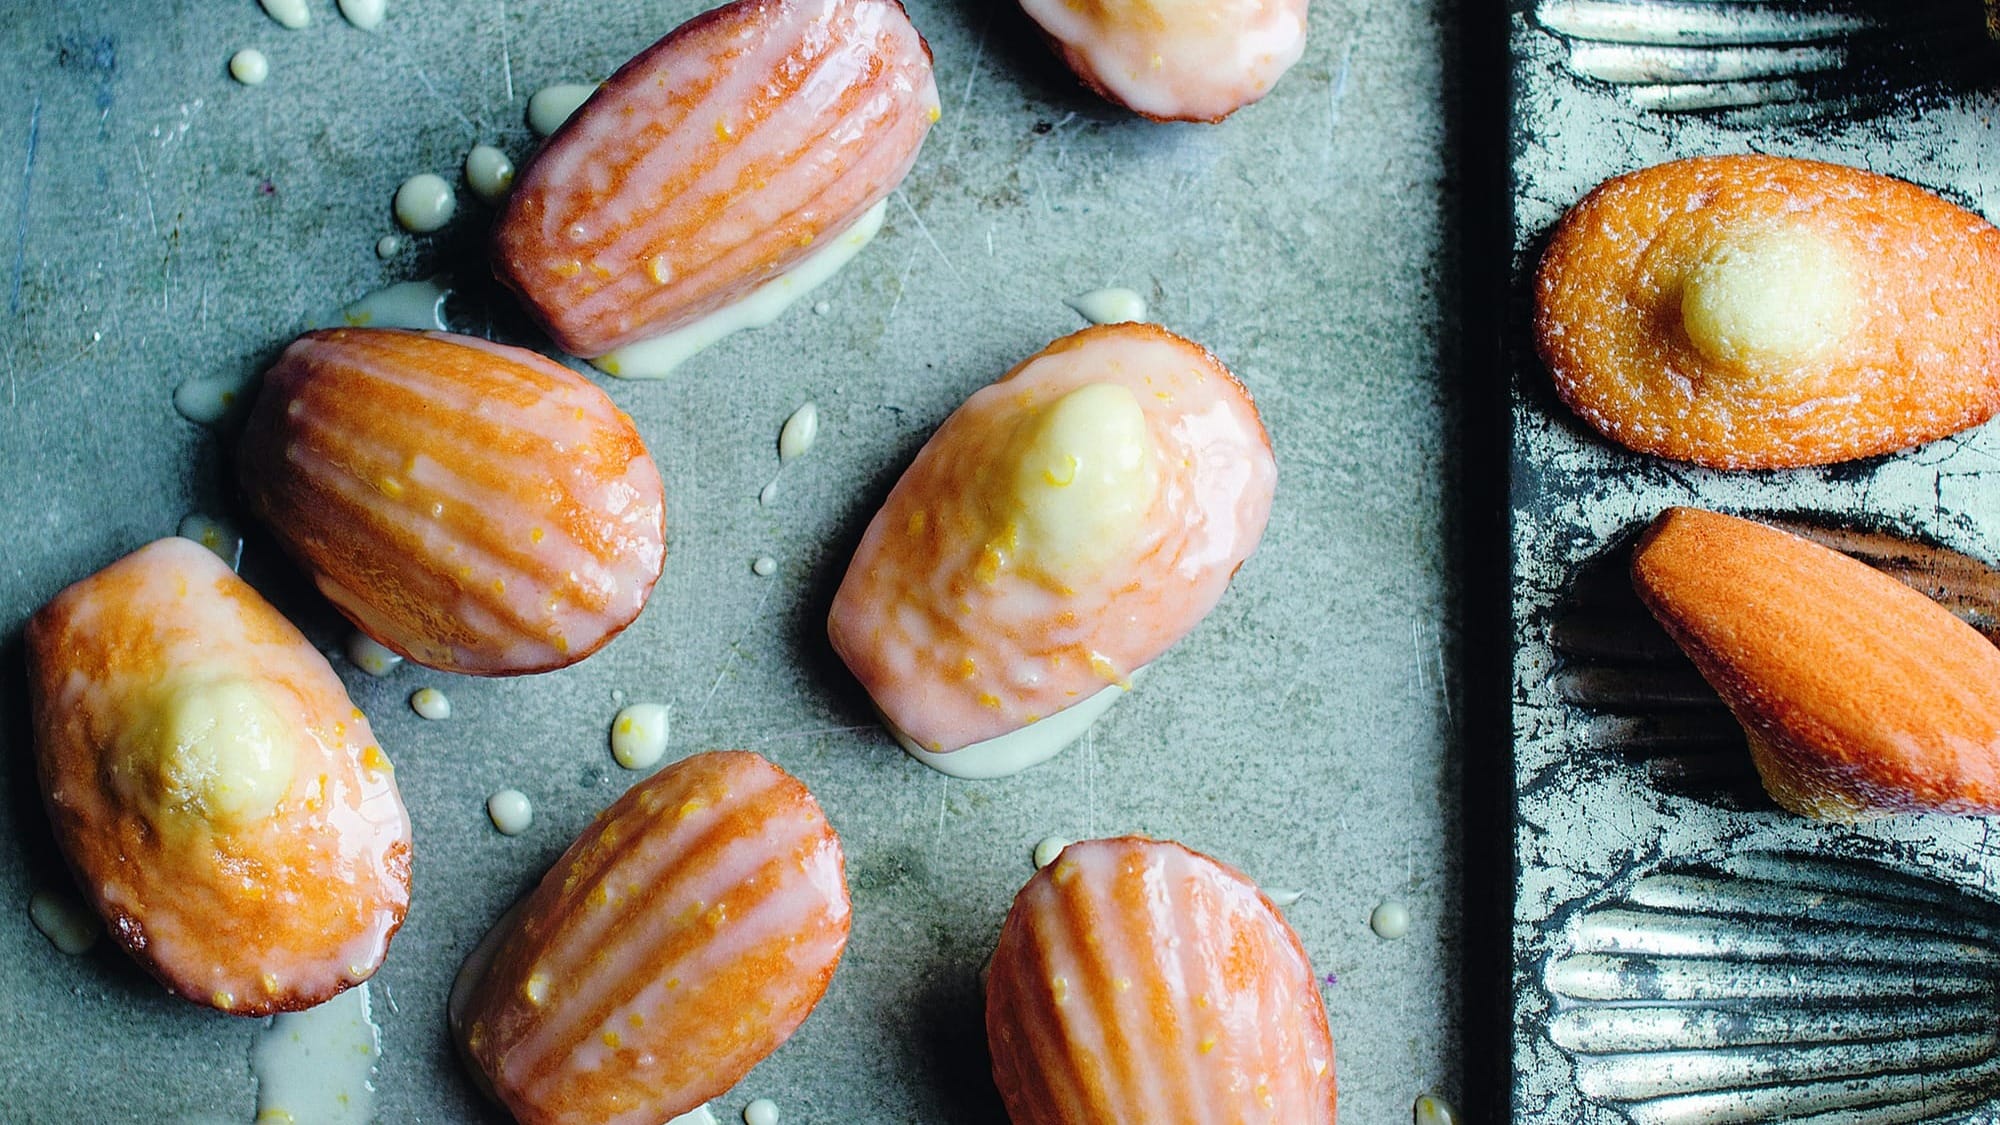
“For me, these little cakes are brilliant, because the batter can be prepared a couple of days in advance and then baked in no time at all – the perfect prepare-ahead recipe. They are also really versatile. I have flavoured them in all sorts of ways, from mixing cacao nibs into the batter to using a blood-orange glaze, and even dipping them in tempered chocolate.
“To get that characteristic shape, there are a few things you can do to help. Firstly, chill the batter for at least three hours and chill the tray for an hour before baking. Secondly, don’t overfill the mould, as this will result in a plain, domed madeleine without that classic hump. And thirdly, baking at a relatively high temperature also helps.”
Ingredients: (Makes 12)
2 large eggs100g caster sugar100g plain flour, plus extra for dusting1tsp baking powder100g unsalted butter, melted and slightly cooled, plus extra for greasing
For the lemon glaze:
Zest and juice of 1 lemon160g icing sugar, sifted
Method:
1. Put the eggs and the sugar in a large bowl and, using an electric mixer, whisk until thick and pale, about six to eight minutes. Put the flour and baking powder in a separate bowl and whisk together to combine. Sift a third of the flour mixture over the egg mixture, carefully folding to combine using a spatula, then add the remaining mixture in two additions in the same way.
2. Take a large spoonful of the batter and add this to a small bowl along with the butter, mixing them together to lighten the butter. Pour the butter mixture into the batter and gently fold together to combine. Press a sheet of clingfilm onto the surface of the batter, then put it in the refrigerator to chill for at least three hours before baking. (The mixture can be chilled for up to two days at this stage.)
3. To make the lemon glaze, put the lemon zest, juice and icing sugar in a medium bowl and mix together using a wooden spoon until you have a smooth, pourable glaze. Press a piece of clingfilm onto the surface of the glaze until needed – this will help to prevent it from forming a crust.
 BON APPETIT: Edd’s new book is available now ( Image: PA)
4. An hour before baking, grease a 12-hole madeleine tray very well and dust with a little flour, tapping out the excess. Transfer the tray to the freezer to chill.
5. Preheat the oven to 220°C (200°C fan/425°F), gas mark 7. When you are ready to bake, spoon the batter into the madeleine moulds. You don’t need to spread it out, as this will happen as the madeleines bake. Bake for eight to 10 minutes until the edges have started to brown.
6. Remove from the oven and immediately turn out onto a wire rack. Leave to cool for 10 minutes, before dipping into the glaze, coating fully. Allow the excess to drip back into the bowl before setting on the wire rack, set over a piece of baking parchment, to set.
These are best served as close to baking as possible – they are great the day they are baked.
Prices correct at time of publication
READ NEXT
Dining and Cooking