

 Shaun Smith is a writer, journalist and former chef in Toronto. He is the author of the young adult novel Snakes & Ladders. The holiday season is upon us and there is no better time to get into the kitchen and start baking. For parties, visits and gifts it is always great to have some bite-size treats on hand. I spoke to the authors of three new cookbooks to get some great recipes to sweeten up your holidays.
Jason Parsons takes us to Ontario wine country for Icewine Marshmallows, from 3 Chefs: The Kitchen Men.
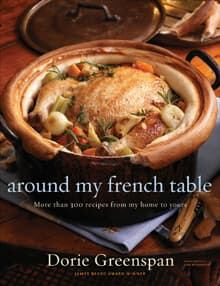
Dorie Greenspan celebrates in Paris with Cocoa Sablés, from Around My French Table.
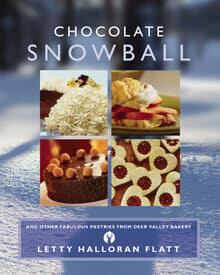
Letty Halloran Flatt, in Utah’s ski country, serves up Linzer Heart Cookies, from Chocolate Snowball.
My recipe this month is a variation on that Canadian icon, the butter tart. These Mini Maple Pecan Butter Tarts use a classic butter-tart filling revved up with maple syrup, and the crust is made with buttermilk instead of water to give them a hint of sourness to balance out the sweetness. These little beauties will disappear about as fast as you can set them out, so be sure to have lots on hand.
Mini Maple Pecan Butter Tarts
Ingredients (Makes 24 mini tarts)
Crust
1 cup (225 mL) all purpose flour ¼ lb (115 g) butter 1 pinch salt 2 Tablespoons plus 1 teaspoon (35 mL total) buttermilk 1 ice cube
Filling
½ cup (118 mL) packed brown sugar 1/3 cup (79 mL) maple syrup 1/4 cup (60 mL) melted butter (cooled but still liquid) 4 teaspoons (20 mL) dark Rum 2 teaspoons (10 ML) vanilla extract 1 cup (225 mL) chopped toasted pecans 50 to 60 raisins 4 pinches Kosher salt 4 pinches cinnamon
Shortcrust pastry is simple to make. The most important thing is to not overwork the dough. The more you work the dough, the less flaky your crust will be, so handle it as little as possible. It is also very important to use chilled ingredients.
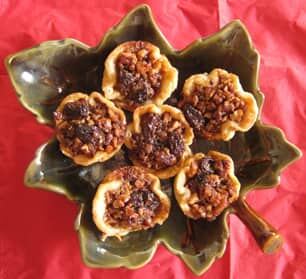 These tarts are best enjoyed just slightly warm. ((Shaun Smith))
I use buttermilk in this recipe to give the tarts a slightly sour flavour that complements the sweet maple syrup. Keep the buttermilk in a cup in the fridge until ready to use. Mix your flour and salt together in a large bowl. Cut the chilled butter into cubes about the size of standard sugar cubes. Place the butter cubes in the flour, and using a pastry cutter, cut the butter into the flour until the butter is thoroughly coated in flour and the mixture has a texture ranging from rice grains to pea-size.
Remove the cup of buttermilk from the fridge and place the ice cube in the buttermilk. Sprinkle half the cold buttermilk over the flour and butter mixture. Using a wooden spoon, toss the mixture together to distribute and absorb the buttermilk. Repeat, adding the rest of the buttermilk, targeting any dry crumbs and tossing them into the wetter portions of the dough.
Turn all of the dough out onto a floured surface. Dust your hands with flour and then gather all the pieces of dough together pressing them firmly in as few movements as possible into one large mound. Do not knead the dough. If any of the dough still seems overly dry and crumbly, sprinkle on a little more buttermilk using your fingertips and press it into the mound. Cut the mound of dough in quarters and wrap each quarter in plastic. Cool the sections of dough in the fridge for at least 30 minutes.
Meanwhile, in a large bowl, mix together all the filling ingredients by hand with a spoon.
Have ready one buttered 24-cup or two 12-cup mini-muffin pans.
When the dough has cooled, unwrap one quarter and place it on a floured surface. Roll the dough into a strip about 3½ inches (89 mm) wide and 18 inches (457 mm) long. It will be very thin, but don’t worry. Thin is what you want for these tarts. Cut six rounds out of the strip, about 3¼ inches (82 mm) in diameter each, using a cookie cutter or a drinking glass. Lift the rounds one at a time into the muffin cups. Do not press the dough down into the cup as you might a pie pastry into a pie plate. Rather, let the dough relax into the cup. Each should be in full contact with the bottom of the cup, and be relatively even around the top of the cup, but allow the walls of the tart shells to be wavy and uneven. Repeat with each portion of cooled dough. (Tip: If at any point a hole develops in the bottom of one of the crusts, simply press a bit of scrap dough down into the hole to seal it.)
Give the pecan mixture a good stir and then spoon enough of the mixture into each tart shell to fill the shell almost to its brim. Make sure there are two or three raisins in each shell. Use a pastry brush or your fingertips to lightly dab the edges of the pastry with egg wash.
Bake at 350º F (180º C) for 20 to 25 minutes, or until the pastry is golden brown. Watch the last couple of cooking minutes closely, as oven temperatures do vary. Remove from the oven when done and gently run a paring knife around the outside of each shell to loosen it from the pan. Allow to cool for five to 10 minutes before transferring to a serving plate, and then cool for at least another 15 minutes before serving. They are best enjoyed just slightly warm (hot sugar burns the tongue!), or at room temperature.
Jason Parsons’ Icewine Marshmallows Jason Parson (right) along with his co-authors Michael Bonacini and Massimo Capra.
“A few years back, one of my cooks came up to me and asked ‘How do you make marshmallows?'” says Jason Parson, executive chef at Peller Estates Winery in Niagara-on-the-Lake, Ont. “I didn’t know, so we started playing around with it.”
At the time, Parsons developed this recipe — which can be found in the new book 3 Chefs: The Kitchen Men — for the television magazine show City Line, on which he and the book’s co-authors, chefs Michael Bonacini and Massimo Capra, appear each week to give cooking instructions. Parsons now serves these treats at the Peller Estates restaurant, where they have become extremely popular.
“We have fire pits outside the restaurant,” says Parsons, “where people roast marshmallows on sticks while drinking hot chocolate laced with ice wine. Last year, on New Year’s Eve, we had guys in tuxedos and ladies in gowns,” he laughs, “with marshmallows running down their chins.”
The marshmallows are also extremely popular during the Niagara ice wine festival, held each January following the grape harvest. Peller Estates served over 3,000 marshmallows at the 2010 festival and Parsons expects the same this year.
“This recipe has become a bit of a phenomenon down here,” he states. If you don’t have a fire pit in your back yard, Parsons recommends browning the marshmallows using either a small blow torch of the sort that has become popular for making crème brûlée, or your oven’s broiler.
Icewine Marshmallows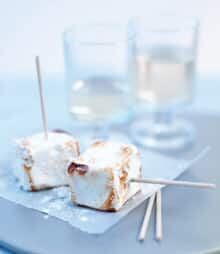 These treats are served at the Peller Estates restaurant. ((Ian Garlick))
(Reprinted with permission from 3 Chefs: The Kitchen Men by Michael Bonacini, Massimo Capra & Jason Parsons. Copyright 2010 © The Madison Press. Published by Whitecap Books.)
Ingredients (Makes 40 marshmallows)
¾ cup/175 mL cold water 3 pkg unflavoured gelatin 2 tbsp/25 mL icewine reduction (see below) 2 cups/500 mL granulated sugar 2/3 cup/150 mL corn syrup ¼ tsp/1 mL salt 1 vanilla bean Icing sugar for dusting
Pour ½ cup (125 mL) of the cold water and the gelatin into the bowl of a stand mixer and let sit for 10 minutes.
Meanwhile, mix the remaining water, the icewine reduction (see below), sugar, and corn syrup in a pot. Bring to a boil and simmer for one minute. Remove from the heat and add to the mixing bowl with the water and gelatin. Add the salt and whisk on high for eight minutes. Add the seeds from the vanilla bean and whisk for another two minutes on low, just enough to blend.
Line a nine-inch (22.5 cm) square cake pan with plastic wrap and spray with non-stick coating. Pour the mixture into the pan and let it set in a cool, dry area (but not the refrigerator).
Once the marshmallows are firm, cut into 40 one-inch (2.5 cm) squares and dust with icing sugar.
To make the icewine reduction, simmer one cup (250 mL) of icewine down to two tbsp (25 mL). You can also use a late-harvest wine, which lacks a little of the richness of icewine but is much cheaper.
Dorie Greenspan’s Cocoa Sablés Dorie Greenspan is the author of Around My French Table. (Alan Richardson)
“I went to Paris for the first time as a young unformed adult in the 1970s,” says Dorie Greenspan, speaking from her home in New York City. “I just had this immediate connection with the city. When I came back, I told my mother that she’d made this terrible mistake by having me in Brooklyn. I said she was really meant to have me in Paris and I’ve spent the rest of my life paying for her poor judgment.”
Of course, Greenspan is joking, but that first trip to Paris did make a formidable impression on her, planting the seed for a decades-long relationship with the city that has now culminated with the publication of her gorgeous new cookbook, Around My French Table.
“I kept going back,” says Greenspan, “and then 13 years ago, my husband and I got an apartment in Paris, which I always think of as having gotten a kitchen in Paris. This book is really a reflection of all those years of being madly in love with France, its people and its food.”
But just because the recipes in her book are for French food, it doesn’t mean they are difficult to cook, says Greenspan. “This is really everyday food,” she states. “I think we have an outdated idea of what French food is. I call it elbows on the table food.”
The large dessert section in the book holds many recipes that would be suitable for just about any holiday celebration — such as vanilla éclairs, honey-spiced madeleines, speculoos (a brown-sugar cookie popular at Christmas), and cocoa sablés, the French cousin of the buttery shortbread cookie.
“At the holidays it’s nice to not have a big dessert, but just something sweet that people can nibble at,” says Greenspan. “Cocoa sablés are perfect because they are easy to make and they are pretty. You can roll the logs and keep them in the freezer. That way they become simple slice-and-bake cookies. You just dust them with sugar when ready to bake.”
Cocoa Sablés
(Reprinted with permission from Around My French Table [pp 402-403] Copyright 2010 © by Dorie Greenspan. Published by Houghton Mifflin Harcourt.)
 (Houghton Mifflin Harcourt) Sablé means sandy, and it describes the slightly crumbly texture of the French shortbread that bears its name. What it doesn’t even hint at is how rich a sablé usually is — the best sablés have a no-two-ways-about-it butteriness that defines the genre as much as the texture does.
In fact, without the butter, you wouldn’t get the texture. Whether the sablé melts in your mouth, as this one does, or has the bit of crunch you get with a sablé Breton, depends on the amounts of flour, butter, and sugar and on whether or not you add the eggs, but in the end, every card-carrying sablé has that distinctive crumbliness at its core.
This slice-and-bake sablé is a slight variation of one of Pierre Hermé’s. It should be made with deep, dark cocoa powder, and to get the loveliest texture, the dough should be worked as little as possible. I’ve added some very finely chopped chocolate to the recipe — just enough to speckle the cookies and deepen the flavour — but it’s an optional flavouring. Also optional is the sparkle edging, a crunchy white ringlet obtained by brushing the logs of dough with egg and rolling them in sugar, preferably decorating sugar, before cutting them and sending them into the oven.
Finally, I like to make these cookies thick — I slice them at ½-inch (1.25 cm) intervals — because I think you can appreciate their texture best when you’ve got something substantial to bite into, but you can make them thinner, of course. Do that, and they’ll make fine ice cream sandwiches. (Try them with Ben & Jerry’s Coffee Heath Bar Crunch.)
Be prepared: You’ll need to chill the dough for at least three hours.
Ingredients (Makes about 36 cookies)
2¾ cups (627 mL) all-purpose flour 1/3 cup (79 mL) unsweetened cocoa powder, preferably Dutch processed ½ teaspoon (2 mL) salt 2½ sticks (10 ounces) unsalted butter, at room temperature 2/3 cup (158 mL) sugar 1 teaspoon (5 mL) pure vanilla extract ¼ pound (115 g) semisweet or bittersweet chocolate, finely chopped (optional) 1 large egg (optional) Decorating sugar (optional)
Whisk the flour, cocoa, and salt together.
In the bowl of a stand mixer fitted with the paddle attachment or in a large bowl with a hand mixer, beat the butter on medium speed until soft and smooth. Gradually add the sugar and keep beating, scraping the bowl as needed, until the mixture is creamy but not airy. (You want to be beating, not whipping.) Mix in the vanilla. Reduce the mixer speed to low and add the flour mixture in three additions, mixing just until the ingredients are incorporated — no more. If you’re using the chopped chocolate, stir it in now, using a large rubber spatula.
Scrape the dough onto a cutting board and divide it in half. Roll each piece into a log that’s about 1¾ inches (4.5 cm) in diameter. (Rolled to this diameter, the baked cookies will be about 2½ inches [6.35 cm] across. If you’d prefer larger or smaller cookies, shape the logs accordingly.) Wrap the logs in plastic wrap and chill for at least three hours.
When you’re ready to bake, position the racks to divide the oven into thirds and preheat the oven to 350 degrees F (180 ºC). Line two baking sheets with silicone baking mats or parchment paper.
If you want to sugar-crust the cookies, beat the egg in a small bowl. Put some decorating sugar on a piece of wax paper. Brush the logs with the beaten egg and then roll them around in the sugar, pressing the sugar gently to get it to stick evenly.
Slice the logs into ½-inch-thick (1.25 cm) cookies. (If you’d like thinner cookies, cut them 1/3 inch (0.85 cm) thick. You can cut them a hair thinner, but those won’t hold up for ice cream sandwiches. If you do make thinner cookies, make sure to reduce the baking time.) Arrange the cookies on the baking sheets, leaving a generous inch of space between the rounds.
Bake the cookies for 15 to 18 minutes, rotating the sheets from top to bottom and front to back at the midway point, until the cookies are just firm to the touch. Transfer them to racks to cool to room temperature. If you’ve got any dough left over, slice and bake it, making sure your baking sheets are cool first.
Serving
These cookies can be served alone, with tea, or, better still, with espresso or milk, but they’re also nice spread with jam or ice cream.
Storing
The logs of dough, without the egg wash and sugar, can be kept in the refrigerator for up to three days or wrapped airtight and frozen for up to two months. You can slice and bake the cookies straight from the freezer; just add a minute or two to the baking time.
Letty Halloran Flatt’s Linzer Heart Cookies Letty Halloran Flatt is the author of Chocolate Snowball. Celebrating its 30th anniversary this year, Deer Valley, in Park City, Utah, is widely regarded as one of the best ski resorts in the U.S. Letty Halloran Flatt, author of Chocolate Snowball, the new cookbook from the pastry kitchens of Deer Valley, has been with the resort from day one.
“The first two years I worked on the mountain, as ski patrol,” says Flatt. “But I’d always been baking out of my house and I got to know the chef in those years. When I told him I wanted a job, he put me in the bakery.”
That chef must have seen something in Flatt, because she has since gone on to become the executive pastry chef for Deer Valley, overseeing a large team of pastry chefs and bakers who produce thousands of cookies, cakes, pies, muffins and other tasty baked goods daily for the resort’s many restaurants.
“We have three main lodges with day and night restaurants as well as banquet facilities,” says Flatt. “We also have two mountain-top cabins with daytime restaurants. We can accommodate 8,500 skiers a day and because we are so well known for our food, it is a rare sack lunch that appears at Deer Valley. At peak season, we’ll serve 1,000 cookies a day out of each lodge.”
One of the popular cookies at Deer Valley is their Linzer cookie, based on the famous Linzer torte, a jam-filled tart with a lattice top and a nut-based crust that originated in the Austrian city of Linz. Flatt recommends playing with different shapes and fillings for these cookies during the holidays.
“A cranberry sauce instead of the raspberry jam would be good in these,” says Flatt. “At Christmas we cut them with a fluted round so they look like a wreath. A Christmas tree cutter would also be cool, or a square shape like a present. We also sometimes use lemon curd in these. Orange marmalade would also be good.”
Linzer Heart Cookies
(Reprinted with permission from Chocolate Snowball Copyright 2011 © by Letty Halloran Flatt. Published by Lyons Press/Globe Pequot Press.)
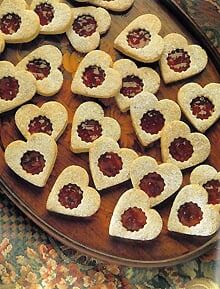 The Linzer cookie originated in the Austrian city of Linz. ((Michael Skarsten))These are beautiful sandwich cookies, filled with raspberry jam that peeks through a hole in the sugar-dusted top. Cinnamon spicy and almond nutty, they make charming valentines — and are perfect for weddings as well. For Christmas, use round fluted cutters and your Linzer cookies will resemble miniature wreaths.
Ingredients (Makes 24 to 30 cookies)
8 tablespoons (115 g) unsalted butter, room temperature ¼ teaspoon (1 mL) grated lemon zest ½ cup (118 mL) sliced almond, ground * ¼ cup (59 mL) ground cake trimmings or graham cracker crumbs ** 1/3 (79 mL) cup sugar 1 egg ¼ teaspoon (1 mL) vanilla extract 1 ½ (343 mL) cups all-purpose flour ½ teaspoon (2 mL) ground cinnamon Pinch ground cloves Pinch salt ½ teaspoon (2 mL) baking powder About 1/3 cup (79 mL) good quality raspberry preserves Confectioners’ sugar for dusting the top cookie
* Grind the almonds, cake trimmings and sugar all at once in a food processor. The sugar keeps the nuts from getting oily and processing the three ingredients together saves time.
**If you don’t have any leftover cake trimmings, substitute graham cracker crumbs or chocolate wafer crumbs. Chocolate cake or wafer crumbs make a darker Linzer dough; yellow cake or graham crackers make a lighter dough – I use a mix of both light and dark crumbs.
Directions for the Linzertorte Dough:
In a large bowl, using an electric mixer, cream the butter and lemon zest until light and fluffy. Mix in the ground nuts, cake crumbs and sugar. Add the egg and vanilla. Scrape the sides and bottom of the bowl and mix well. Sift together the flour, cinnamon, cloves, salt and baking powder. Mix into the creamed butter until the dough comes together, scraping as needed. Wrap in plastic wrap and refrigerate at least three hours, until the dough is very cold.
Directions for the Linzer Heart Cookies:
 (Lyons Press/Globe Pequot Press) Preheat the oven to 325º F (163º C). Line three large baking sheets with parchment paper or oil them lightly with canola oil. Divide the dough into four portions. Roll one portion at a time, keeping the others refrigerated while you work.
Flatten one of the portions into a round disk using your hands. On a lightly floured surface, roll it less then 1/8 inch (3 mm) thick, using short, coaxing strokes of the rolling pin. Lift and turn the dough frequently, dusting the work surface and the rolling pin with as much flour as needed to keep the dough from sticking. With a two-inch (5 cm) heart shaped cutter, cut out about 10 hearts. Arrange them about ½-inch (1.25 cm) apart on one of the baking sheets. Roll 10 more hearts out of another dough portion and arrange on the baking sheet. These will be the bottoms of the cookie sandwiches. Gather the scraps and refrigerate.
Roll and cut the third portion of dough as you did the first two. Using a ½-inch (1.25 cm) round cutter, cut out a hole in the center of these hearts and arrange them on the other baking sheet; they will be the tops of the cookie sandwiches. Repeat with the last portion. Chill, roll and cut all the leftover dough scraps into an equal number of tops and bottoms, Bake for 12 to 14 minutes, or until the cookies no longer appear raw and you can slide a cookie on the baking sheet and it will move without losing shape. Cool.
To assemble, spread about ½ teaspoon (2 mL) of raspberry preserves in the centre of each cookie bottom. Sprinkle the cookie tops with confectioners’ sugar. Gently press a “dusted” heart on top of each “jammed” bottom.
Dining and Cooking