
Key points
The stovetop smash burger earned the top spot for its deeply browned crust and juicy interior.
Grilling with the lid closed is the best option for thick, classic burgers with smoky flavor.
Air fryer burgers fell short; their texture was consistently lackluster.
Not much beats a juicy smash burger fresh from a cast-iron skillet. Or perhaps you’re a patty purest and prefer a thicker burger grilled over charcoal. You may even love a TikTok hack you saw for cooking burgers in an air fryer. There are many ways to cook a burger, but what exactly is the best, most reliable method?
That’s exactly what we investigated, testing six popular ways to cook burgers, including oven, air fryer, stovetop, and grill methods. The goal was to find the best, most consistent method that produces juicy, well-seasoned burgers with a pleasantly browned crust.
Related: Chefs Swear by These 7 Unconventional Burger Toppings
Read on to learn our favorite method for the most craveworthy, delicious burgers. The top spot happens to be one of the easiest methods we tried.
Julia Levy tested all of the burger methods.
A word about our method
A great burger starts with using the right ground beef to form the patties. We used 80/20 ground beef, which has enough fat to keep the burgers juicy and tender. We used 1/3 pound of ground beef per burger, and the patties were about 3/4-inch thick. All burgers were cooked to medium-rare (130°F to 135°F internal temperature). The only exception was the smash burger, which was thinner and cooked to a higher internal temperature.
Related: 10 Cheeses for Melty, Gooey Burgers
The burgers were seasoned with salt and pepper only after the patties were formed. Seasoning the ground beef too early could disrupt muscle proteins, making the final product tough and dry. The patties were gently formed to avoid overworking the beef, and a small indentation was pressed into the center of each patty to help prevent puffing.
Air fryer
Credit: Food & Wine / Photo by Caley Ellenburg / Food Styling by Chelsea Zimmer / Prop Styling by Josh Hoggle
Cook time: 7 minutesTotal time: 10 minutesRating: 3/10
Method: For this test, preheat an air fryer at 400°F for 3 minutes. Form the patties, season them well, and place them in the air fryer basket, ensuring they’re at least an inch apart to encourage even airflow. For medium-rare, cook the burgers for 3 minutes per side.
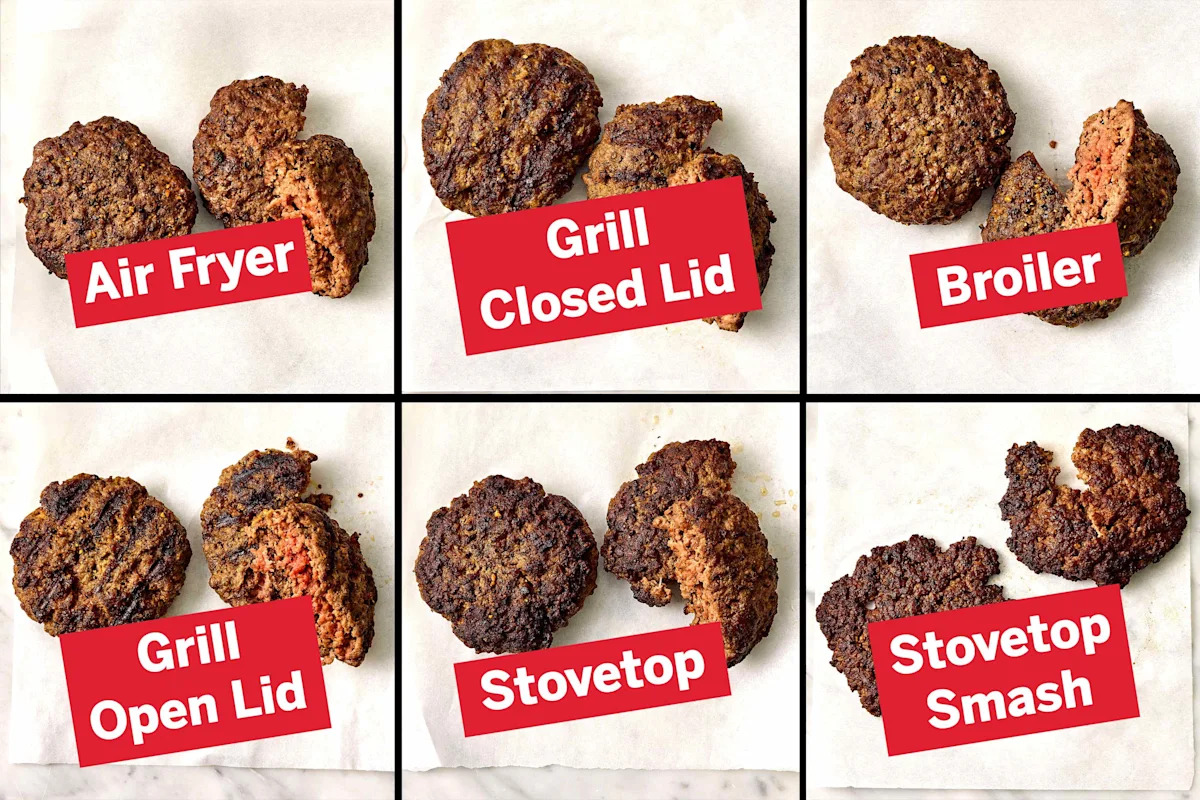
Results: This was clearly the least favorite method for all tasters. The burgers actually looked delicious fresh out of the air fryer, but the texture was a mess. Instead of being charred on the outside and juicy inside, the burgers seemed wet. One taster said the burger had a raw beef mouthfeel even though the internal temperature was on the higher side of medium-rare. Of all the methods on the list, this was the clear pass.
Pros: Cleanup was simple, as the mess was contained to the air fryer basket. There’s no need to turn on the oven or heat up the grill; a simple tabletop appliance is all you need.
Cons: There was no discernible crust, and the flavor was lacking. Worse, the texture and mouthfeel were off-putting. (Although we didn’t test it, we suspect that medium to medium-well burgers might fare better here.)
Grill (open lid)
Credit: Food & Wine / Photo by Caley Ellenburg / Food Styling by Chelsea Zimmer / Prop Styling by Josh Hoggle
Cook time: 6 minutesTotal time: 31 minutes (includes grill preheating time)Rating: 6/10
Method: This is the classic backyard cookout technique: tossing a couple of burgers on a hot grill. This is a basic grilled burger that starts with a grill preheated to high (450°F to 500°F). Make sure the grates are scraped clean and oiled well, then add the patties. Cook, uncovered, until the internal temperature reaches medium-rare, about 3 minutes per side, flipping once halfway through cooking.
Results: Despite the low rating, this is not a bad method — it’s just inconsistent. The ambient temperature and wind level seem to play a big role in the results. The smoke blew away from the grill, meaning the burgers didn’t pick up that classic smoky grilled flavor. The burgers did get the quintessential grill marks, though, and they stayed juicy.
Pros: Appealing grill char marks. Great for a crowd, as you can make many at once. Little clean-up.
Cons: No discernible smoky grill flavor. Inconsistent cooking from ambient air temperature and wind level.
Broiler
Credit: Food & Wine / Photo by Caley Ellenburg / Food Styling by Chelsea Zimmer / Prop Styling by Josh Hoggle
Cook time: 6 minutesTotal time: 15 minutesRating: 6.5/10
Method: Place the oven rack 6 inches from the heat source. Preheat the broiler to high. Shape the patties, then season with salt and pepper. Line a large rimmed baking sheet with aluminum foil. Place the patties on the prepared baking sheet at least 2 inches apart to encourage even air circulation. Broil until the burgers reach medium-rare, 2 1/2 to 3 minutes per side.
Results: This one was the most surprising on this list, as the results were solid. The broiler produced a juicy, flavorful burger. However, since the broiler is like an upside-down grill, concentrating heat on the upper side of the burger, there was no direct contact with the heat source; this resulted in a lackluster crust. This method had far less browning compared to the other methods on this list.
Pros: You can cook up to 8 burgers at a time, and cleanup is simple. You only need to preheat the broiler, which is faster than heating the grill. The patties were also juicy.
Cons: There is no classic charred crust, and the oven gets smoky from fat splatter. It’s also easy to overcook the patties.
Stovetop patty
Credit: Food & Wine / Photo by Caley Ellenburg / Food Styling by Chelsea Zimmer / Prop Styling by Josh Hoggle
Cook time: 6 minutesTotal time: 15 minutesRating: 7.5/10
Method: This is the method many people grew up with and still use today when it’s too cold to grill. Preheat a large cast-iron skillet over medium-high heat until smoking, about 5 minutes. Form the patties with a dimple and season with salt and pepper. Add 2 tablespoons of canola oil to the skillet and swirl to coat. Add the patties and cook, flipping once, until medium-rare, about 3 minutes per side.
Results: This is a solid burger with a deeply browned crust. Since the meat has direct contact with the hot metal, the burger develops that classic texture like it was prepared on a diner’s griddle. It’s straightforward, reliable, and an easy way to make a great burger.
Pros: Great seared beef flavor and juicy interior with a well browned crust. No need to heat up the grill.
Cons: Since a large cast-iron skillet is typically 12 inches, you can only fit a few burgers at a time, meaning you’ll have to work in batches if feeding a crowd. The method is also messy, producing a lot of grease and splatters.
Grill (closed lid)
Credit: Food & Wine / Photo by Caley Ellenburg / Food Styling by Chelsea Zimmer / Prop Styling by Josh Hoggle
Cook time: 6 minutesTotal time: 31 minutes (includes grill preheating time)Rating: 9/10
Method: This is the method many burger aficionados swear by. Start by preheating the grill to high (450°F to 500°F). Add the patties to the oiled grates and grill, covered, until medium-rare, about 3 minutes per side.
Results: This was the clear winner for full-size patty-style burgers, as the meat was juicy and pleasantly smoky. Like the open-lid grill method, you’ll get solid grill marks and a great browned crust. Grilling with the lid closed creates an ovenlike environment, providing even cooking and concentrating the smoke around the meat. This is also our favorite method when cooking for a crowd, as you can cook 8 or more burgers at a time, depending on the size of your grill.
Pros: The best smoky flavor on this list with a delicious browned crust. Cleanup is simple, and you can cook enough burgers at one time for a crowd. The smoky flavor is more pronounced if using charcoal.
Cons: Flipping burgers over a grill may cause flare-ups. This method works best during warmer weather.
Stovetop smash burger
Credit: Food & Wine / Photo by Caley Ellenburg / Food Styling by Chelsea Zimmer / Prop Styling by Josh Hoggle
Cook time: 16 minutesTotal time: 20 minutesRating: 10/10
Method: This method deviates from the rest, as these are thin, smashed-down burgers, not the classic fat, juicy patties. Shape the meat into roughly 3-ounce balls. Heat a large cast-iron skillet or griddle over medium-high. When the pan is hot, add some canola oil and swirl to coat. Working in 2 batches, place the meatballs in the skillet, ensuring they are 3 inches apart. Coat the back of a heavy metal spatula with cooking spray, then smash each ball to flatten to about 1/3-inch thickness. You can also use a cast-iron burger press lined with parchment paper to flatten the patties. Sprinkle each flattened burger patty with salt and pepper, and cook until browned and lightly crisp, about 2 minutes. Flip and sprinkle with more salt and continue cooking until cooked through, another 1 to 2 minutes.
Results: This was everyone’s favorite burger, as the crust was perfect. The thin, smashed patties develop tremendous caramelization. The meat was also very well seasoned in each bite. While it’s quite different from a traditional thicker patty, our tasters said the interior remained juicy and very meaty, while the crust was wonderfully browned. This one tastes like a really delicious burger from a fast-food restaurant.
Pros: The best browned crust on this list. Very even cooking for a juicy interior and crisp exterior. The large surface area also encourages even seasoning throughout, making for a tastier burger compared to thicker patties.
Cons: There’s a fair amount of oil splatter when making smash burgers. The interior temperature of the burgers will always be at least medium or higher. It’s difficult to make smash burgers for a crowd.
Final takeaways
It seems like smash burgers have been hot for the last several years, and for good reason. Of all the different methods tested, our absolute favorite way to cook a burger was in a very hot cast-iron skillet, smashed to a thin, crisp patty. While it’s difficult to prepare lots of smash burgers for a party (unless you have an outdoor flattop griddle), that deeply browned crust and flavorful meat are worth the wait.
If you want a more classic thick patty, turn instead to the grill. The high direct heat encourages even browning and cooking. Just be sure to keep the lid closed to cook the burger evenly and pick up that quintessential smoky flavor.
Read the original article on Food & Wine
Dining and Cooking