

Portable charcuterie box ideas for picnics and road trips work best when every bite has a place to land. I learned that after one leaky container soaked the crackers, napkins, and my car seat. That lesson stuck! The fix isn’t fancy. It’s a smart box, dry textures, and food you can grab without a balancing act.
The short version
Pack the Two-Texture Rule for a Picnic Charcuterie Box
Layer the Color-Block Snack Box
Build the Three-Compartment Picnic Box
1Pack the Two-Texture Rule for a Picnic Charcuterie Box

Start with one crisp food and one soft food in each area of your box. I like a warm-white box with camel accents and black clips, while an organic bouclé carrier gives the setup a softer finish.
A lidded Bento box works better once you’re moving. You’ll keep crackers crisp when they don’t touch grapes, olives, or anything dressed in oil.
Your first compartment might hold whole-grain crackers, while the next gets sliced cheddar and a few grapes. That contrast feels generous without making the box heavy. Don’t pack every item in equal amounts.
You need more crunch than cheese if you’ll be driving for an hour.
A small bouclé-lined tote gives your lap or picnic blanket a soft landing, and it keeps the container from sliding. I’ve used a folded tea towel for the same reason. It looks relaxed, but it saves you from chasing a runaway box across the grass.
If you’re planning a longer drive, pair this box with portable picnic perfection with layered charcuterie jars. The jars handle wetter ingredients while your box stays pleasantly dry. That’s a practical value when you’re comparing the cost of extra containers with the cost of replacing ruined food.
2Layer the Color-Block Snack Box

Color makes a portable snack box feel abundant before anyone takes a bite. Midnight blue, copper, and ivory give it a richer rhythm, while a small Nero Marquina marble accent adds contrast without requiring more food.
Color makes a portable snack box feel abundant before anyone takes a bite.
3Build the Three-Compartment Picnic Box

Three compartments are enough for most people. One gets savory bites, one gets fruit, and one gets something sweet or crisp. I’ve found that six tiny sections encourage overpacking, while three broad areas let you see what you’ve brought.
Use soft goat cheese in a sealed cup rather than spreading it directly into the box. Add seeded flatbread beside it, with a separate handful of almonds in the third section. You’ll have variety, but the ingredients won’t mingle before you’re ready.
Your portions don’t need to match. Put the item you expect to disappear first in the largest space. For children, that might be mini pretzels.
For adults, it may be fruit and cheese. The box should fit your appetite, not an imaginary styling rule.
A removable silicone divider is worth choosing if you’ll wash the box often. It won’t absorb oil, and you can lift it out when crumbs collect underneath.
Keep deep-pile mohair velvet to the carrier or tote exterior rather than the food-contact area. Sage green, warm cream, and natural wood make the whole setup feel calm without making it precious.
If you’re weighing cost against value, start with the container you already own. You can always upgrade later when you know which sections actually help. For a broader travel mood, these hidden Italian road trips offer useful picnic inspiration.
💡
Quick tip
If you’re weighing cost against value, start with the container you already own.
4Swap Crackers for a Road-Trip Crunch Ladder

Crackers are useful, but they’re not your only dry option. A terracotta, stone, and olive palette makes the box feel warmer, while Carrara marble with subtle gray veining suits a more permanent serving setup at home.
5Anchor the Box With a Tiny Cheese Board

A small cheese board inside a larger container gives your picnic box a clear center. Choose one firm cheese, one creamy cheese, and one bold bite. That’s enough personality without turning your lunch into a tasting course.
Try Manchego, brie in a paper cup, and a few sharp cornichons. The firm cheese can travel loose, while the brie should stay wrapped until you stop. I’d rather unwrap one item at the picnic than clean a soft cheese smear from the lid.
Your board doesn’t need to be expensive. A thin reclaimed weathered teak tasting board works, but a piece of parchment is easier to fold and discard. You’ll gain space and lose the weight of another dish, which matters when your bag already holds water and a blanket.
If you’re styling the box for guests, use a small piece of aged brass at the destination, not in the moving container. It looks warm beside clay tones and linen, but it has no business bouncing around near the fruit.
A compact cheese board can be worth it when you’ll reuse it for brunch, snacks, and entertaining. If you’re still comparing options, a layered jar setup can provide a lower-cost alternative.
✓
Worth remembering
A compact cheese board can be worth it when you’ll reuse it for brunch, snacks, and entertaining.
6Separate the Wet Foods Before You Leave

Wet foods are where most portable charcuterie boxes go wrong. Keep olives, pickles, hummus, and cut tomatoes in sealed cups, even if your container claims to be leakproof.
But you don’t need a dozen matching jars. Two small cups can handle most of the messy ingredients.
I use plum-colored cups with grey lids and rose-gold clasps for mustard and jam, then place them in a corner with the lids facing up. You’ll know immediately if one has shifted. A small olive cup with a snap lid keeps brine away from crackers and saves the bottom of your bag.
Skip sliced tomatoes unless you’re eating within a short window. They release juice quickly, and no amount of careful packing changes that.
Choose sun-dried tomatoes instead. They’re earthy, chewy, and far less likely to turn your box into a damp compartment.
Your napkin should sit outside the food area, wrapped in grey linen or tucked into the tote pocket. At home, a small Calacatta marble tray with gold veining can hold the cups before you pack them. That separation makes the entire stop feel easier.
A few good cups deliver better value than a complicated, expensive container with too many narrow sections. For a relaxed destination idea, these Italian road trips pair beautifully with a slow picnic stop.
7Mix Sweet and Salty in the Passenger-Seat Box

A sweet-salty box is ideal when you’re traveling with someone who wants dessert before lunch.
📌 Save this to Pinterest

8Frame a Kid-Friendly Snackle Box Picnic
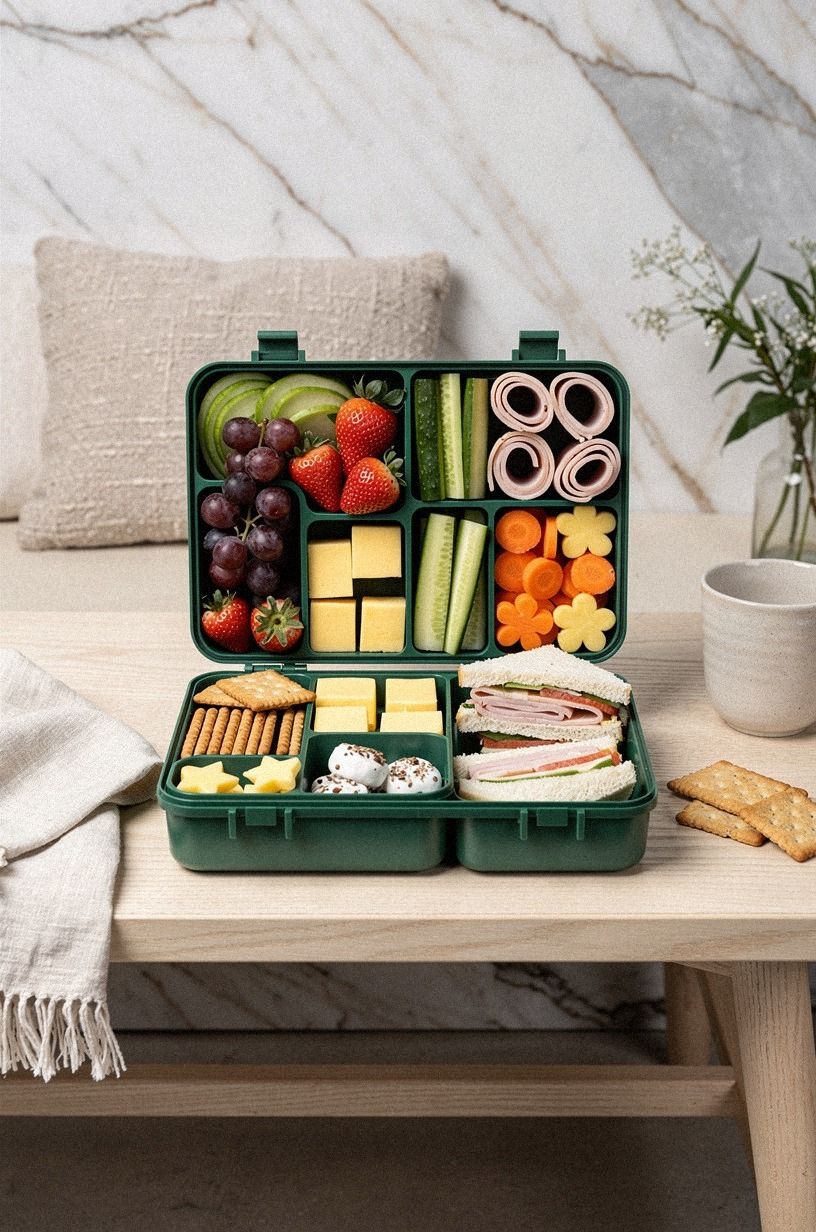
A kid-friendly snackle box needs clear choices and easy reach. Use wide sections for mini cucumbers, crackers, berries, and cheese cubes. Tiny compartments look clever, but they’re frustrating when small hands are already sticky.
I’d skip foods that require spreading or cutting at the stop. Pack turkey roll-ups instead of deli slices, and choose seedless grapes over fruit that needs a knife.
You’re not lowering the quality. You’re removing the moment when everyone asks who packed the utensil.
An emerald, gold, and cream divided snack container can work well for this format, especially when each child gets a familiar section. At the destination, a small backlit translucent onyx tray can hold the box and napkins. Put the preferred food in the easiest spot to reach.
You’ll have fewer interruptions from the back seat, and the box will feel like a small bit of control.
And if your route includes a longer drive, keep a second dry bag for wrappers and used napkins. The food box stays clean, your child gets independence, and you won’t have to balance trash on your lap. That’s a calming little upgrade for everyone.
The budget-friendly choice is usually the container that’s easy to wash and replace. Don’t pay for delicate features your child won’t use. These offbeat road-trip ideas can help you choose a cheerful picnic destination.
9Chill the Soft-Cheese Pocket Before You Leave

Soft cheese tastes better when it’s cold enough to hold its shape.
10Stack the Three-Height Lid Strategy

A flat box can still look layered if you vary the height of the food. Put folded prosciutto in a low corner, stand breadsticks upright in a narrow cup, and add a small mound of grapes in the middle. The eye moves through the box instead of seeing one crowded surface.
This is my Three-Height Lid Strategy. Low, medium, and tall foods give your portable snack box a little structure without extra decoration.
You’ll want the tallest item under the lid, though. If it presses against the top, it’ll arrive crushed.
Use breadsticks for the tallest layer and a small ramekin for dips. A dusty-rose napkin, charcoal cup, and brass accent add warm contrast, while warm travertine works well beneath the box during a home serving stop. I’d avoid glass when you’re carrying the box on foot.
It’s weighty, and one slip can end the picnic before it begins.
Your lid should close with gentle pressure. If you have to force it, remove one item.
A crowded box looks generous until you open it, and then every bite has touched every other bite. The best presentation still leaves food room to breathe.
You don’t need a premium box to get this effect. A budget container can look remarkably polished when the food has height and breathing room. If you’re planning a scenic route, these road trips make a memorable backdrop for a carefully packed lunch.
Rule of thumb
You don’t need a premium box to get this effect.
11Make a No-Cook Mediterranean Portable Snack Box

A Mediterranean box feels fresh without requiring a kitchen.
💰
Where the money goes
A Mediterranean box feels fresh without requiring a kitchen.
12Why Does the Passenger-Seat Box Work?

The passenger-seat box works because it keeps the food visible, stable, and within reach. You’re less likely to forget a compartment when the lid is clear, and you won’t need to unpack a full tote at the first stop.
Choose midnight-blue containers with copper clips and ivory lids so the box can sit beside a water bottle. Sharp corners waste space and catch on fabric. A Wayfair picnic basket can carry the larger supplies, but the snack box should stay small enough to lift with one hand.
I’d skip putting the box on the floor. It’s harder to reach, more likely to tip, and usually warmer than the seat.
Use a non-slip mat under it instead. An oversized-chip terrazzo tray can hold the larger supplies at home, while the travel box stays light enough for the car.
And if you’re driving alone, pull over before opening the lid. No snack is worth reaching across the console while moving. The box is supposed to make your road trip easier, not give you one more distraction.
The extra cost of a non-slip mat is usually modest, and its value is obvious after the first sharp turn. If you’re choosing a destination next, these hidden Italian road trips can inspire a slower, more rewarding stop.
13Arrange the Five-Minute Rest-Stop Box

A rest-stop box should be fast to open and fast to close. Pack apple slices, firm cheese, pretzels, and a sealed dip in four obvious zones. You’ll know where everything is before you leave the car.
Use a lemon juice cup only if you’ll eat the apples soon. For a longer drive, choose whole fruit such as a small pear or clementine. It holds up better, and you won’t be wiping juice from the lid.
Your container can sit inside a sage-green lunch tote with a warm-cream napkin and a natural-wood handle. Keep utensils in the outer pocket, not under the food.
I learned that after digging through a packed tote with one hand while holding a coffee in the other. At home, a hand-applied Venetian plaster shelf can hold the tote between trips.
For a more polished stop, add smoked almonds and a few squares of dark chocolate. It’s still casual, but you’ll feel like you packed a real break rather than grabbed random items at the last minute.
A simple rest-stop box is usually worth the price because it replaces impulse snacks and saves time. If you need destination inspiration, these hidden Italian road trips reveal la dolce vita.
The stylist’s trick
A simple rest-stop box is usually worth the price because it replaces impulse snacks and saves time.
14Warm the Fall Road-Trip Palette

Fall is the easiest season for a warm charcuterie box. Use cranberry-colored apples, roasted nuts, amber grapes, and a firm cheese with a golden rind. Terracotta, stone, and olive accents make the setup feel inviting without adding decorative leaves to your food.
A shagreen detail on the tote or serving pouch adds texture without competing with the food. I’d skip bright plastic colors for a fall setup. They compete with the ingredients and make the box feel more like a children’s party.
If your road-trip corner grows into a full hosting area, the supplied US planning benchmarks look like this:
Tier
What it covers
Typical US cost
Budget
paint, textiles, art, organization
$200-$800
Mid
accent furniture, lighting, rug
$1,500-$5,000
High
main furniture, custom millwork
$8,000-$25,000+
Those figures describe the supporting room, not the groceries inside your box. Your own picnic can stay simple with a stone-colored blanket, a reusable container, and food you already have. The point is a comfortable stop, not a styled production.
A warm palette can make a low-budget setup feel thoughtful and inviting. You don’t need to buy a new blanket if an old one already gives you the right texture. For an especially scenic outing, these offbeat road trips offer memorable fall picnic possibilities.
15Repack a Reusable Box You’ll Keep Using

The best portable charcuterie box is the one you’ll repack next weekend. A clay, linen, and aged-brass palette keeps it warm, while washed Belgian linen makes a reusable carrier feel softer without adding much bulk.
The Rule I Keep After Too Many Soggy Crackers
I used to believe a good picnic box was mostly about abundance. More cheese, more fruit, more little jars, more color. Then I carried one down a windy trail and opened it to find soft crackers, leaking mustard, and grapes rolling under the seats.
The box looked full, but it didn’t work. That changed how I pack.
Now I choose the container before I choose the food. If the lid is loose, the box stays home. If the sections are too narrow, I use fewer ingredients.
Farrow & Ball Pigeon No.25 might make a lovely wall color, but no paint shade can rescue a box that has one wet compartment touching everything else.
I also stopped treating picnic food like a display that has to remain untouched. People should be able to reach in, take a bite, and close the lid again. Washed Belgian linen helps keep my supplies together at home, while a small unlacquered brass knife waits in the tote for serving.
The setup is useful first, pretty second.
The best boxes have a little restraint. One firm cheese, one soft cheese, two fruits, two crunchy foods, and one salty extra are usually enough. You can add more if you’re feeding a group, but you shouldn’t need twelve separate flavors for two people.
The warmest picnic is the one where you’re talking, looking at the view, and not managing a leaking container.
A Few Things Worth Answering
What is the best portable charcuterie box for a small picnic?
A three-compartment box with a firm lid is the best choice for most small picnics. Choose one section for dry foods, one for fruit, and one sealed cup for cheese or dip. IKEA storage pieces work well at home, while a divided lunch box travels more easily.
Where can I buy portable charcuterie box pieces on a budget?
Look at IKEA, Target, and Wayfair for containers, small cups, and washable totes. You can also find useful pieces through Facebook Marketplace or a thrift store. I don’t use commission links here, so choose the shop and price that suit you.
How much does a portable charcuterie box makeover cost?
A basic box can use food and containers you already own, while a larger setup may cost about $100 to $300 depending on the cooler, tote, and serving pieces. The free part is the arrangement. Your existing napkins and jars can do plenty, so the upgrade may not be worth the price for a casual picnic.
Can I create a portable charcuterie box on a budget?
Yes, and you can start with three actions: reuse a food container, pack seasonal fruit, and place wet foods in small jars. Benjamin Moore White Dove OC-17 is not necessary for the box, but a clean cloth setting can make simple food look polished.
Is a portable charcuterie box worth it in a small space?
Yes, because a compact box limits clutter and keeps every food within reach. Choose a container that fits your cooler, then place the largest items in the center. You’ll enjoy a tidy picnic without carrying a full basket of separate dishes.
Is a portable charcuterie box a good idea for a rental?
Yes. Use a removable tote hook, a tension rod for picnic linens, and a washable tray instead of permanent storage.
Sherwin-Williams Agreeable Gray SW 7029 can inspire a calm palette, but no wall changes are needed to make the setup feel intentional. That keeps the cost low while preserving the room’s value.
Where I’d Start First
If I had to pick one, I’d start with the three-compartment box. It keeps wet foods away from crisp ones, so your crackers still snap when you reach the overlook. Pack it tonight, then pin this guide and save these road trips for your next picnic.
That’s the win!
Dining and Cooking